How to quickly make realistic character animations using new Rokoko motion capture tools in Blender
How many strings do you pull to avoid character animation? Sure, animation can add a lot of life to a scene, but finding the time on an indie project is challenging.
With new tools, endless libraries of mocap recordings, and affordable mocap suits, you can get character animation for your next Blender project done in 15 minutes.
Hi 🖖, we’re the motion capture experts from Rokoko. In the next 5 minutes, you can expect to learn how to use mocap tools (both free and paid) to get the character animation you need, without a single keyframe of manual animation. We’ll also show you how to do it all in a live stream environment.
From now on, it’s safe to assume you can quickly animate characters with a human feel to them.
Free Resource: Retargeting Plugin for Blender
Download Rokoko’s free Retargeting plugin here ➡
Rokoko’s free retargeting plugin for Blender assigns existing motion capture data onto your rigged character. Provided you have a rigged character that’s ready to go and pre-recorded motion capture in Blender; this workflow takes less than 5 minutes. We’ll cover how to use this plugin below in the “Option 1” tutorial.
What is Motion Capture & How To Create Mocap Animations
Motion capture is the process of recording a person’s natural movements and translating them into animation data for use in 3D software. When mocap was first developed, it was used in high-end productions to animate fantastical humanoid characters. Nowadays, mocap is affordable, and its uses range from character animation for games to advanced previs and virtual event production.
Motion capture unlocks a new level of speed for Blender users. This, in turn, allows for greater creativity and more expansive animations despite your budget constraints.
After first using mocap animations, Ian Hubert — the artist behind the famous 1-minute Lazy Blender tutorials — said that he “hadn’t realized how much of my workflow was based around just avoiding having to do legit character animation. When I’m working on a scene now, I can just throw the Smartsuit Pro on and animate all the characters.”
The speed at which you can produce realistic character animation with motion capture opens up a world of new possibilities. Check out how facial mocap helped Ian create this gorey re-imagination of Charlie and the Chocolate Factory.
What Motion Capture Tools Should You Use?
Rokoko motion capture’s tools focus on providing value to creators at all levels and allow you to export data to Blender and other 3D software. Of course, there are other options open to you, such as Optitrack, Vicon, Qualisys, and Mo-Sys, but these systems tend to be complex and unaffordable on anything less than a Hollywood feature film.
From a software perspective:
- Rokoko Studio Studio: Record motion capture data
- Rokoko Remote App: Track facial motion capture
And the hardware:
- Smartsuit Pro II: Portable body-tracking Rokoko motion capture suit
- Smartgloves: For finger trackin
Integrating Rokoko Motion Capture into Your Animation Workflow
There are three ways you can use mocap in your workflow, the one you choose is dependent on the project and resources you have available.
Option 1: Buy mocap data from an online asset marketplace (or download it for free from Rokoko Motion Library)and apply it to your characters in Blender using the free retargeting plugin from Rokoko.
This is the simplest option if you don’t have access to a motion capture suit or the software you need to record your own motion capture.
You can find online marketplaces for mocap animation on websites like Mixamo or check out the Motion Library inside the free version of Rokoko studio. You can download Motion Library for free and access 100 free professional mocap-assets straight away.
Option 2: Record your own mocap data in Rokoko Studio and export it to Blender.
You’ll use your Smartsuit Pro to generate the animation in Rokoko and apply it to your character in Blender using the same plugin as above. You can also add facial animation using the Remote App.
Option 3: Livestream mocap data from Rokoko to Blender (and record in Blender)
You can unlock the power of mocap tools that support real-time integrations by live streaming the animation data from your mocap suit directly to your custom made avatar in Blender.
Option 1: How to use the Rokoko Retargeting Plugin for Blender
Watch the video tutorial “Daily Blender Secrets – Retargeting with the free Rokoko add-on” ➡
Step 1: First, make sure you’ve downloaded and installed the free Rokoko retargeting plugin.
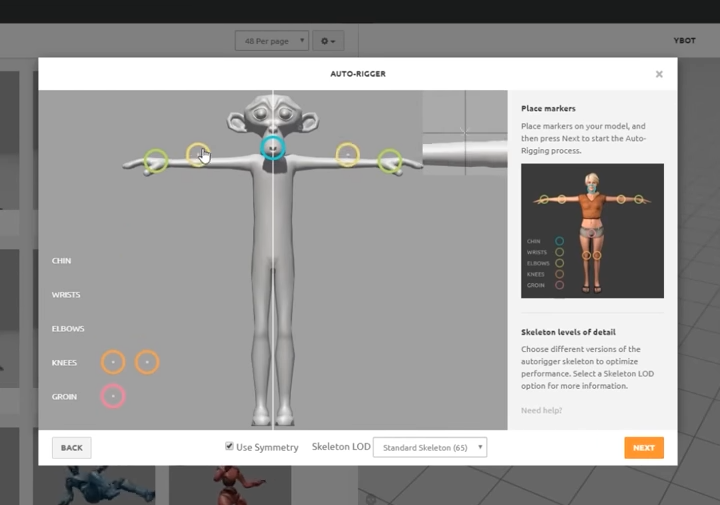
Step 2: Rig your character as usual with Mixamo. In essence, you just need to place the circles in the major joint areas.
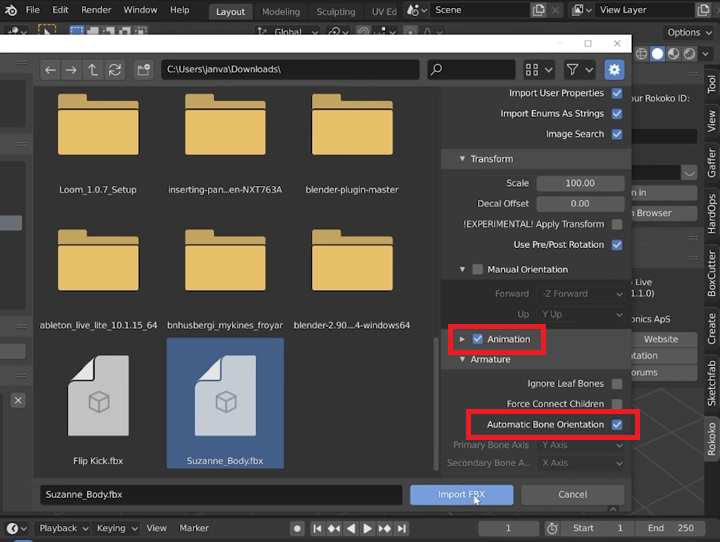
Step 3: Import your rigged mesh into a new scene and check the tick boxes for “Automatic Bone Orientation” and “Animation.” It’s a good idea to also set your scale to 100 if it’s not there already (this makes sure the Mixamo mesh doesn’t import at a super tiny size).
With your mesh successfully imported, load in your BVH or FBX mocap file.
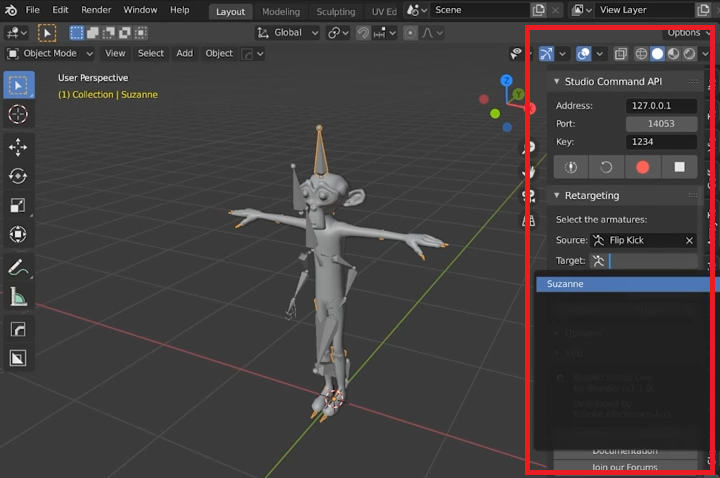
Step 4: With both the mesh and mocap in the same scene, find the Rokoko plugin in the option tab and open it. You’ll need to register a free account to log in.
Scroll down to retargeting and in “Source,” select the animation and in target, select your rigged character. Click “Build Bone List,” and Rokoko will automatically build a list of bones with source and target data.
With the list build complete, you can click “Retarget Animation” to apply the mocap to your character.
All you need to do is delete the source armature, and your character animation is done and ready to go!
Option 2: Record in Rokoko Studio and Import Mocap Data to Blender
Watch the video tutorial: “Simple Auto-Rig Pro + Rokoko Mocap Workflow” ➡
Step 1: This method is pretty simple and takes just a few minutes to set up. The only trick you need to remember is that your character MUST be in a T-Pose to start. This will allow the software to interpret the right motion to the right bones.

Step 2: Download (or create) a character mesh. Remove any pre-made rigs — we’ll be using Auto-Rig Pro and Mixamo to apply the mocap data.

Step 3: Open the Auto-Rig Pro menu >> Smart menu. Select the model, click “Selected Objects” and make a simple rig using Mixamo.
When you’re done, click “Go” to generate your skeleton.
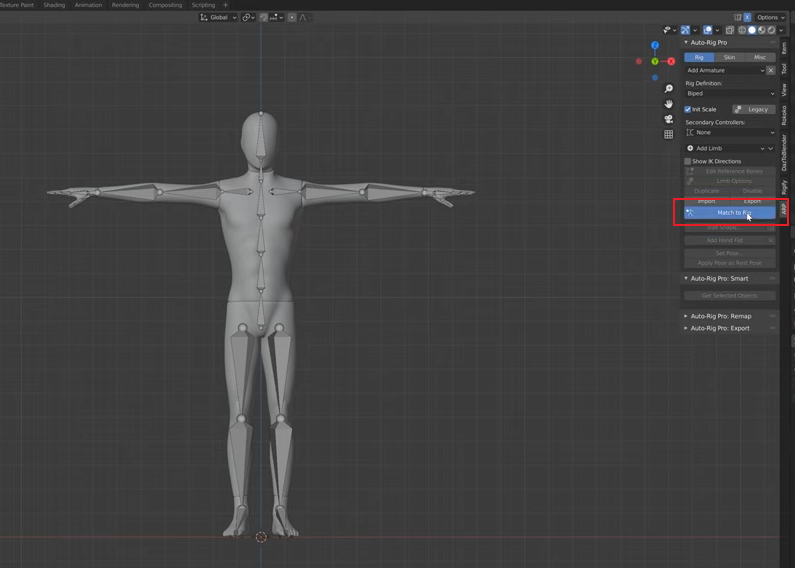
Step 4: Click “Match to Rig,” and Auto-Rig Pro will add its standard animation rig to the skeleton. However, nothing will happen if you move the rig around because you still need to bind the rig to your character mesh.
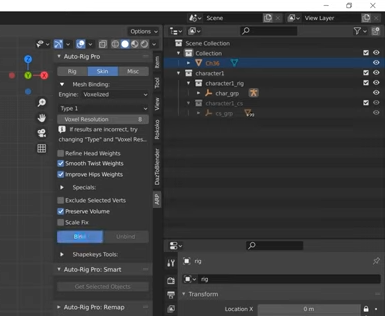
Step 5: Make sure you’re in “Object Mode,” select the rig and mesh and go to the “Skin” tab. Check the checkbox for the “Voxelize” setting and click “Bind.” If you try to move your character rig, your mesh should move with it. (Just remember to reset to the T-Pose).
Now you’re ready to import mocap data to your character!
Jump into Rokoko Studio, link up your Smartsuit Pro, hit record, and you’ve got your mocap animation keyframes. You can also use one of the free sample animations that come with Rokoko Studio. Check out this large library of mocap tutorials to learn more.
Step 6:
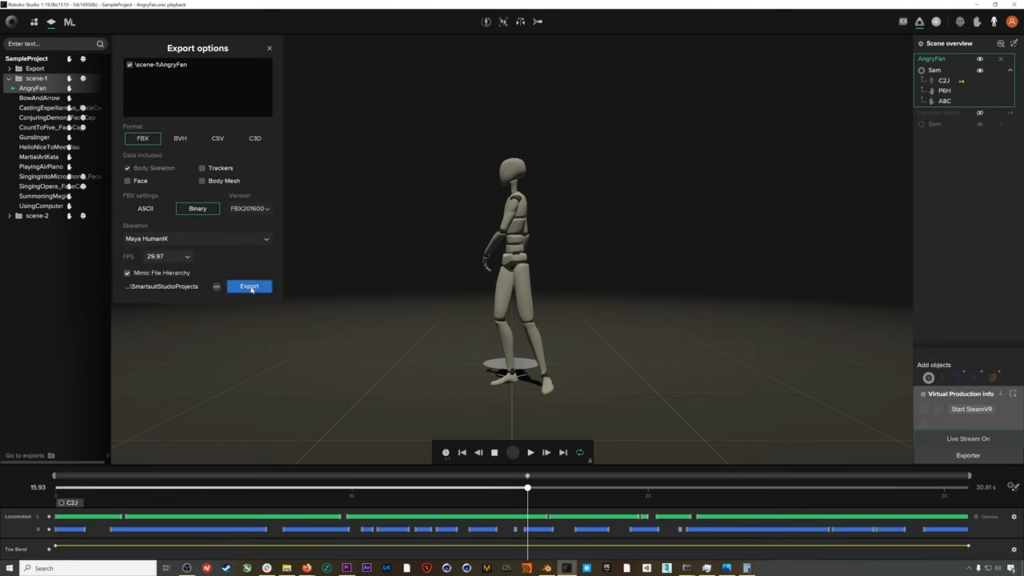
To export the animation, right-click on the animation in your sidebar and select “Export.” Make sure you export with the following settings when importing to Blender:
- As an FBX file
- Binary selected
- At 30 fps (frames per second)
- Maya humanIK skeleton
Switch back into Blender, go to “Import FBX,” and import your Rokoko animation with “Automatic Bone Orientation” checked. Hit play to make sure the animation is imported correctly.
Head to the Remap tab in the Auto-Rig Pro sidebar. While you’re in Object Mode, use the source field dropper to load your mocap armature into the Source field. Next, select your character’s rig and use the dropper to load it into the Target field. It’s a good idea to turn on the autoscale at this point to make sure the mocap and mesh are a similar size. Click “Build” to apply the animation.
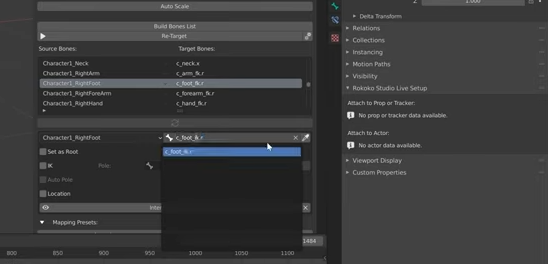
Step 7: Next, find the right foot bone, change it to C_Foot_IK, and check the IK tick box. This basically allows your mocap animation to drive the feed of your character. Just make sure that your character’s hip joint is set as root.
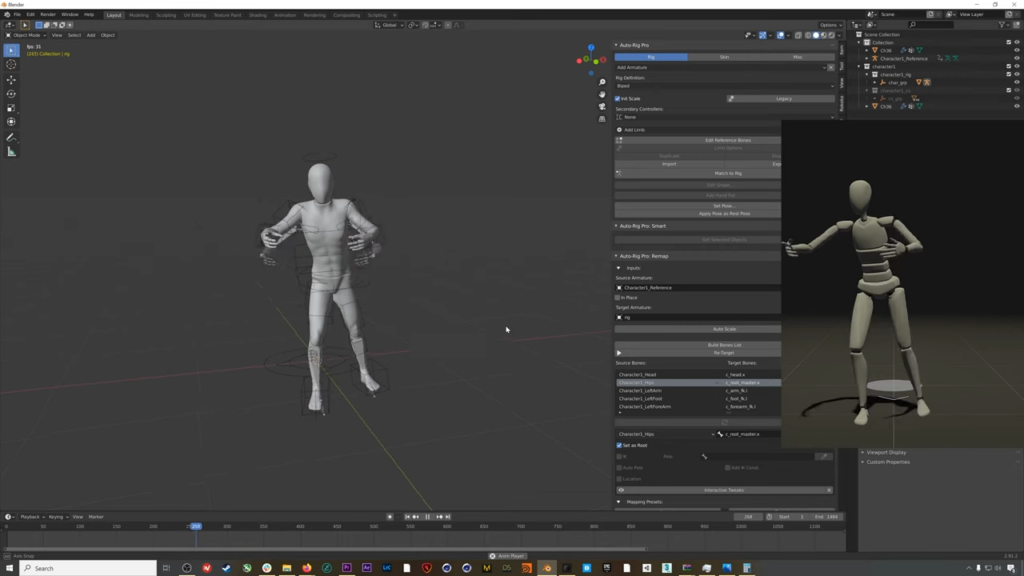
Step 8: Lastly, hit “Retarget” and play the animation, knowing you just saved yourself hours of key-frame animation work.
Option 3: Livestream Mocap Real-Time to a Custom Character in Blender
Watch the video tutorial: “Rokoko Guide: Face and Body Motion Capture in Blender!” ➡

Step 1: Open up Rokoko Studio and connect your Smartsuit Pro as usual.
To add facial motion capture, pull up the Rokoko Remote App on your iPhone. As soon as the app opens, you should see a little green dot appear on the right-hand side of your top toolbar. Click it to open the Rokoko dialog and click the “Connect” button. This will send a prompt to your iPhone, which you need to accept. Next, turn the toggle for “face capture” on within the app.
You should see a face armature populate in the viewfinder,
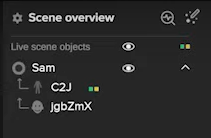
Step 2: To combine the face with your body mocap, drag the head object into the character group inside your Scene Overview sidebar.
At this point, all your motion capture on your armature should be working perfectly.
From here, you could hit record to record the motion (as in option 2), but we’re going to live stream it directly into Blender without recording anything.
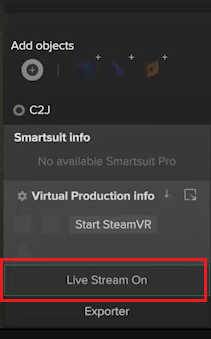
Step 3: Navigate to the virtual production info menu within the same sidebar and click “Live Stream On.” This will open up toggles for all major animation software — make sure you toggle Blender on. Hit the small settings icon to check the port forwarding if you need it.
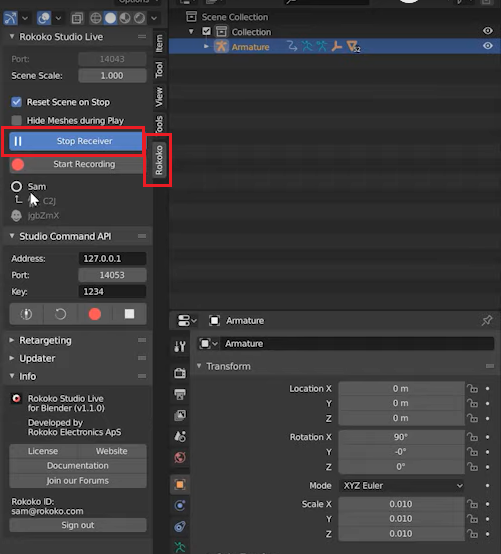
Step 4: Switch over to Blender and navigate to the Rokoko plugin. Click “Start Receiver” to stream your mocap data.
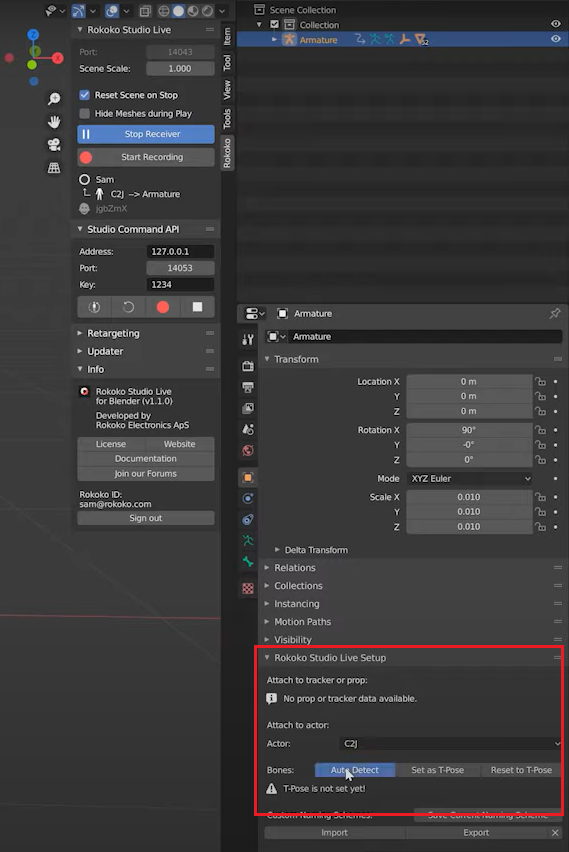
Step 5:
Now you’re streaming the mocap data, it’s time to apply it to your character.
In the scene collection, select your armature and head to the “Rokoko Live Studio Setup” submenu. Select your Smartsuit Pro and click “Auto Detect” for bones. Once that’s run, click “Set As T-Pose” Now, your body motion capture should be streaming live into Blender.
To get your facial mocap data, just select the mesh, and you’ll get an option to attach the face in the same submenu as the body. Click auto-detect, and you’re done!
All your motion capture is now being streamed directly into Blender and can be used for VTubing or simply recording animation in your scene.
Using Mocap to Increase Creative Possibility
There’s a lot that you can do with Rokoko motion capture technology. And the best part is that you can do it fast, and right within Blender or your current workflow. If you want to get started, you can get access to our free library of mocap animations by downloading Rokoko Studio for free here. It’s got some excellent resources for shorts and quick character scenes.
Links to Rokoko
- rokoko.com
- Youtube – RokokoMotion
- Instagram – hellorokoko
- Twitter – hellorokoko
- Linkedin – Rokoko
- Facebook – hellorokoko
Check for other Blender tutorials
Wow, this is an informative post about motion capture in Blender! I’ve always been interested in incorporating motion capture into my 3D animations, but didn’t know where to start. The step-by-step instructions and clear explanations make it seem accessible and doable. The use of Rokoko’s tools seems like a great way to streamline the process and make it more efficient. Thanks for sharing this valuable tutorial!